

This post is also available in: Italian
Reading Time: 10 minutesIn the previous post I’ve describe what is 3CX Phone System and how install it. But the installation part is really easy and short because the most interesting part is the configuration.
Compare to the installation flow, the 3CX Phone System configuration wizard is a little more complex (at least require that you think on what you are doing) but is better structured. The wizard will appear the first time you will walk you through a number of essential tasks that you need to do in order to get your system up and running.
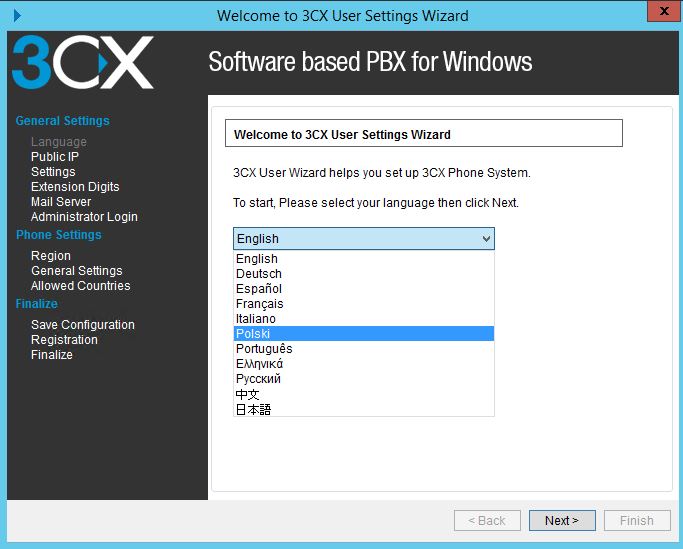
The first step is to select the language that you want to use for 3CX Phone System:
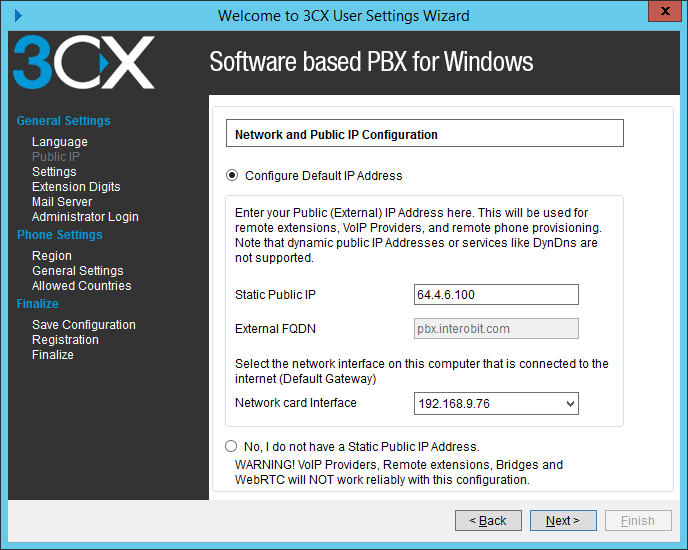
The wizard will proceed and ask for the Static Public IP (the FQDN will be automatically) and the local IP Address which 3CX will use. Note: If you do not have a Static Public IP, VoIP Providers, remote extensions and WebRTC Calls will not work with 3CX.
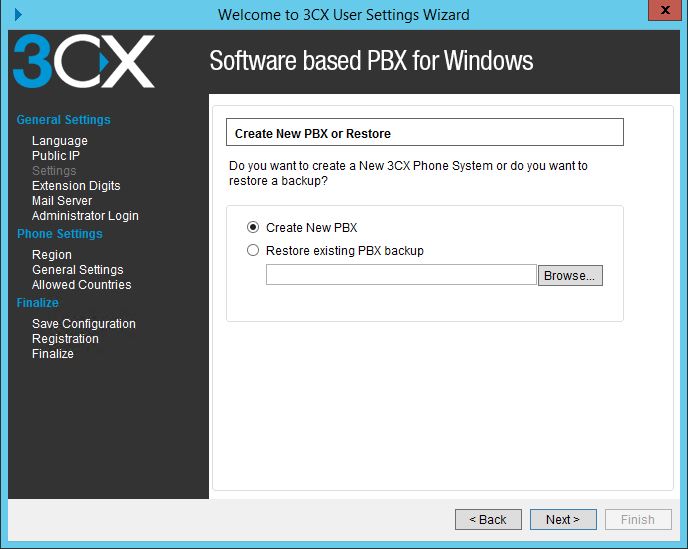
If you are upgrading or moving your 3CX Phone System installation, the wizard will give you the option to restore settings from a backup that was previously created. Of course for a first installation you have to create a new PBX, but the option to restore completly a PBX from a scratch installation and a simple restore is really powerful (on how to set up the backup, see later in this post).
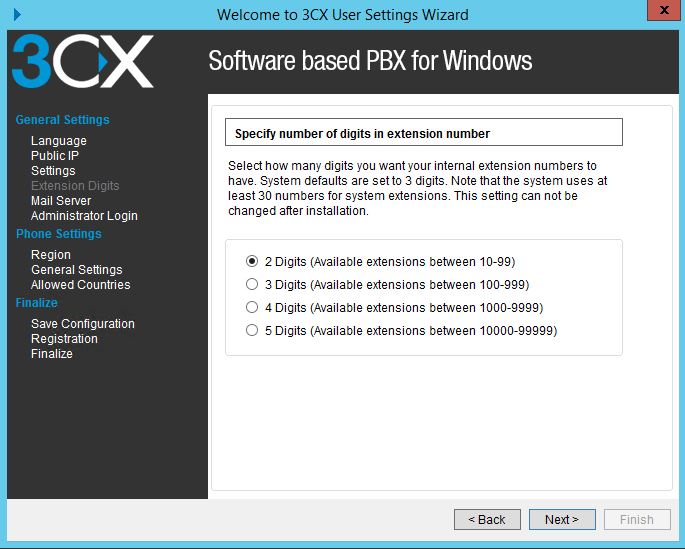
The wizard will then ask you for the digit length of your extension numbers. This is a very important decision since it cannot be altered later on without re-installing and re-configuring the PBX from scratch. This of course depends also on the size of your environment, but using 3 digits could be fine in most cases (2 digits just for small offices).
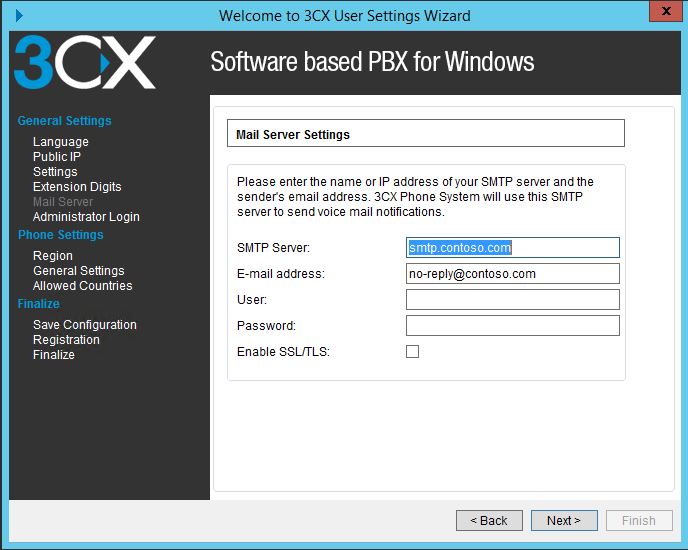
You will then be asked to add your mail server name, reply to address, if necessary authentication details (username/password) and whether the connection should be made via a secure channel (TLS). These settings are used to send email notifications, voice mail and faxes.
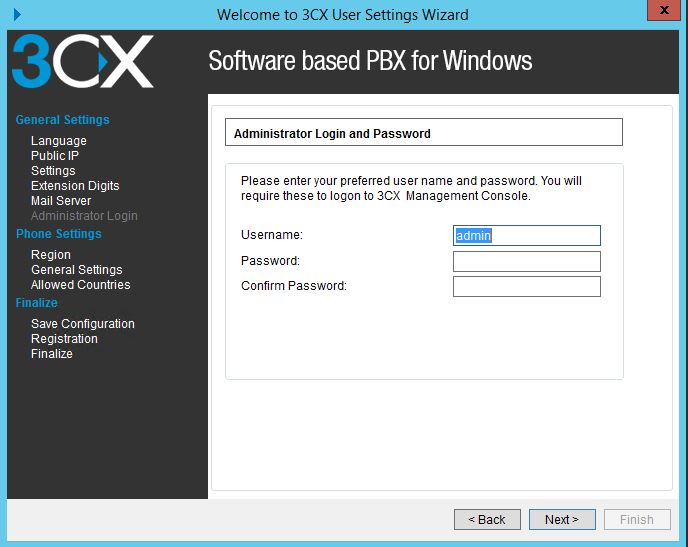
The 3CX Wizard will then ask you for a username and password to be used to login to the 3CX Phone System Management Console and manage the phone system. Make sure to use a strong password to prevent unauthorised access to your PBX. Username and password are both case sensitive.
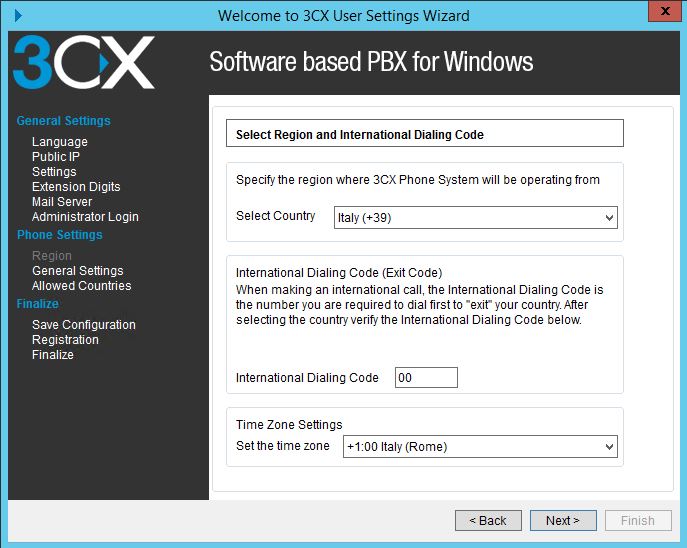
Confirm that the selected country, International Dialing code (exit code) and time zone settings are correct. The wizard auto-selects settings based on your Windows regional settings.
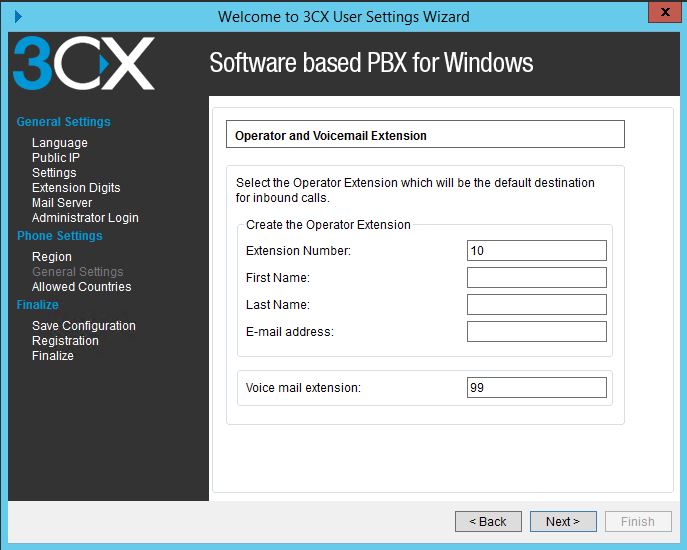
The wizard will ask you to create one extension which will be used as the Operator extension. Additional extensions can be created at a later stage using the 3CX Management Console.
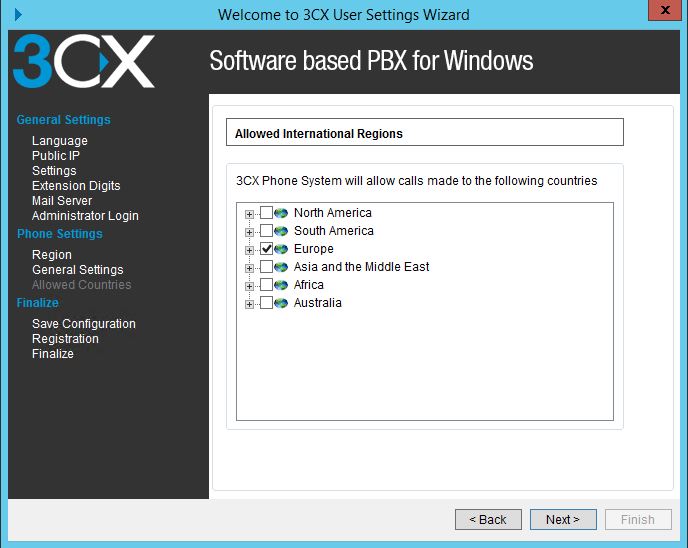
The wizard will then prompt you to specify the countries and regions to which calls can be made. Calls to countries which are not selected, will be blocked. This feature reduces the risk of VoIP toll fraud.
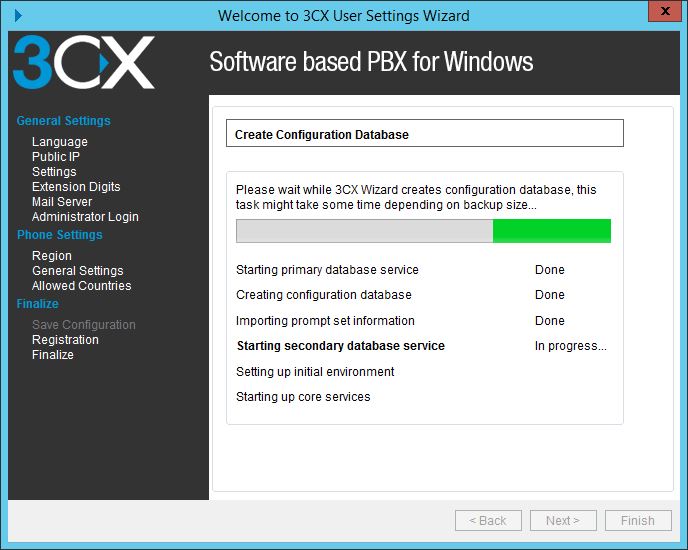
Click “Next”. The 3CX Phone System Wizard will start services and and configure 3CX Phone System.
You will be asked whether you would like to receive a quote for a complete 3CX Phone System. If you do, fill in your details and a 3CX partner will send you a detailed quote. You can skip this step if you do not need a quote at this stage or if you have already purchased a license key for the system.
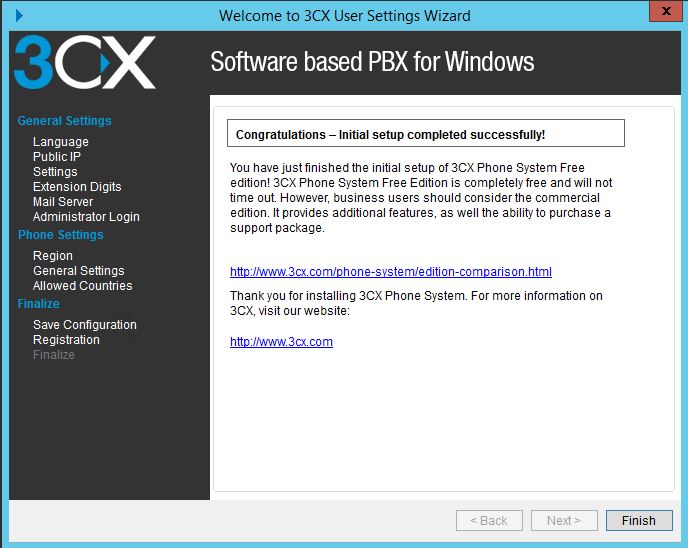
The system is in free edition now, but you can add the licence later using the web interface. When you click “Finish” your browser will launch and open the 3CX Management Console web page.
Otherwise you can point your web browser to the Web Management Console by entering the name of the machine. If you are not using the default HTTP and HTTPS ports, you need to include your selected ports in the URL. For example, if you chose 5000 for HTTP and 5001 for HTTPS your links should be as follows:
- HTTP: http://pbx.interobit.com:5000/management
- HTTPS: https://pbx.interobit.com:5001/management
Depending on the configuration of IIS and the firewall you will not able to access at the Web Management Console from other IP rather than from the same server that host the services and the software. Sometime the issue it’s simple in the rediction phase: be sure to use a comple URL as in the previous examples.
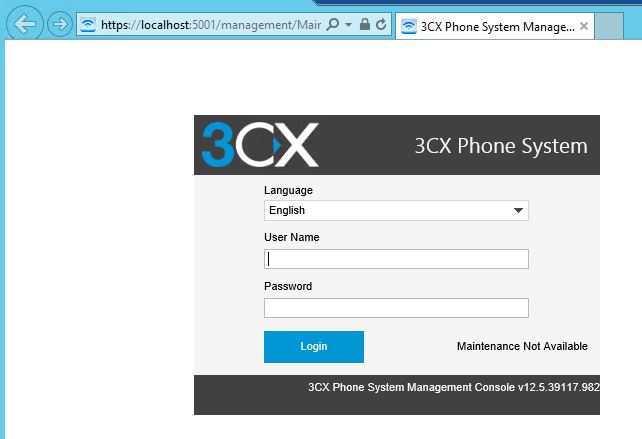
Enter the username and password that you specified during setup, select the language you would like to use and click the “Login” button. Note that the username and password are both case sensitive.
After installation, you must activate your license by going to the “Settings” > “Activate License” page in the 3CX Management Console.
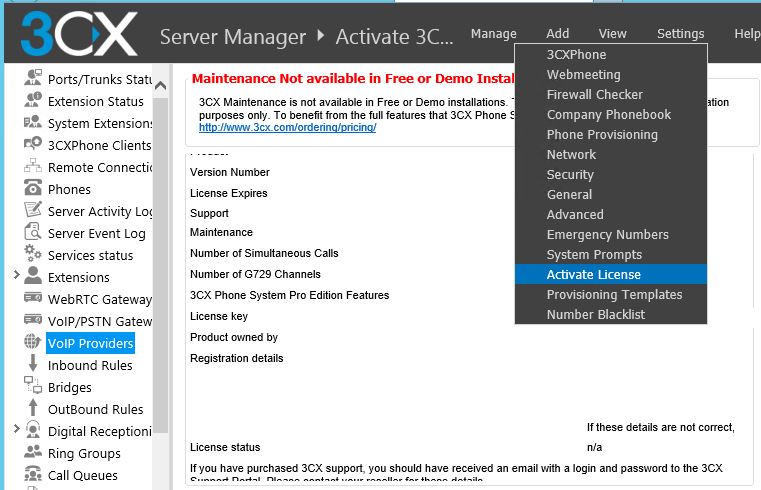
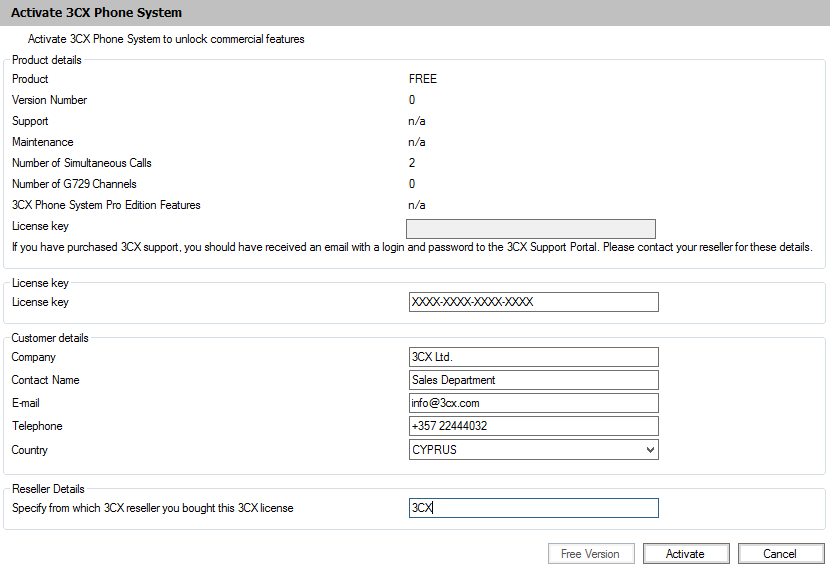
Enter your license key, Company, Contact Name, E-mail, Telephone, Country and the name of your Reseller (The company who you bought 3CX from) and click on “Activate” to activate your license. This information will be sent to our license key server and your license key and installation will be activated. A service restart will be required at this point so please keep that in mind when you activate your license. Note that you need proper firewall rules in order to handle the online activation. Also packets between the 3CX Phone System server and erp.3cx.com should not be filtered or inspected.
You will need to do this each time you re-install 3CX Phone System on a new machine or when a change in the local network topology or hardware occurs (for example the local MAC address changes). 3CX Phone System ships with a US English prompt set by default (but you can select it during the installation). Prompts are recorded voice files that are played by the system to callers and users of the system. For example, when a user picks up their voice mail, the system prompts will instruct the user what buttons to press in order to hear or delete voice messages.
To change the system prompts to a different language:
- Go to “Updates” > “System prompt sets” node, select the prompt set you wish to use and click on “Download Selected”. The prompt set will be downloaded to your machine.
Note: Download only the prompt set that you need. - Go to “Settings” > “System prompts” > “Manage Prompt sets” at the top of the screen.
- Select the prompt set that you have downloaded and click on “Set As Current Prompt Set”. The system will now use this new prompt set.
CX Phone System includes a convenient backup and restore utility that allows you to create a complete backup of your phone system configuration and data to a file. To backup your 3CX Phone System data, run the “3CX Backup and Restore Tool” located in the 3CX Phone System Start menu Program group:
- Select “Backup 3CX Phone System”.
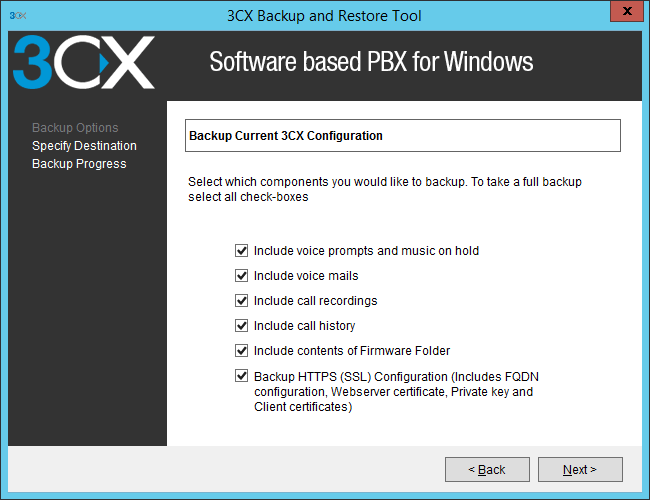
- Choose which components you would like to backup. For a full backup select all checkboxes.
- Select the path and filename to save the backup to. Click “Next”.
- The tool will proceed to backup your PBX.
To restore the phone system data, start the 3CX Backup and Restore utility:
- Select “Restore 3CX Phone System backup”.
- Locate the backup of the 3CX Phone System, select it and click “Next”. The tool will proceed to restore your backup. Note that the current configuration will be OVERWRITTEN with the backup data, and any changes that you have made since performing the backup will be lost. You must also close the management console BEFORE making a restore.
Using the Windows scheduler you can easily schedule a daily phone system backup. To do this:
- Go to Windows Start Menu and search for “Task Scheduler”.
- Run the Task Scheduler and click “Create Basic Task”.
- Select when this task will run and click “Next”.
- Select “Start a program”, click “Next” and browse to the 3CX Backup program. The default path is: “C:\Program Files\3CX PhoneSystem\Bin\3cxbackup.exe”
- In the “Add arguments” entry field, include the command line parameters that you need:
- Hidden – runs the process hidden so it will close automatically after completion
- Backup – will backup the database
- Restore – will restore the database
- Filepath is the location of the database to restore from or backup to
- /callhist – will include the call history database
- /voiceprompts – will include system prompts
- /voicemails – will include voice mails
- /callrecordings – will include call recordings.
- /exit – to exit the utility after backup is done.
- /firmware – backup the firmwares of the IP Phones also
- /ssl – backup HTTPS configuration
The rest of the configuration is pretty more VoIP related starting from the extensions configuration:
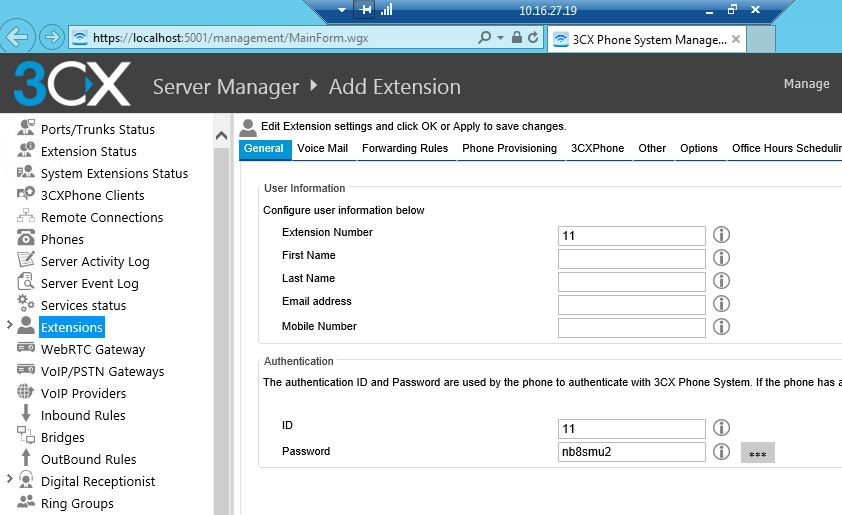
You can set several parameters, but basically the extension number become your login and the password of course your password to logon in the VoIP system. Voice mail is automatically configure (but you can change the criteria on when run). Forwarding rules must be manually configured (if needed).
VoIP or PSTN trunk must be manually configured, but there are several template of common devices or services. But you need to proper configure your firewall rules, expecially for SIP trunk. Please have a look at this article for a more detailed explanation on how to configure your firewall and what ports to open.
In the next post we will see how use this solution.
For more information see also:
- Administrator Manual (HTML) in English, Deutsch, Español, Italiano, русский, Français
- User Manual in English, Deutsch, Español, Italiano, русский, Français
Disclaimer: 3CX was a recurring sponsor on my blog, but I’m not obliged to blog. Furthermore, the content is not reviewed, approved or published by any other person than me.

Related Posts
Andrea Mauro
Virtualization, Cloud and Storage Architect. Tech Field delegate. VMUG IT Co-Founder and board member. VMware VMTN Moderator and vExpert 2010-24. Dell TechCenter Rockstar 2014-15. Microsoft MVP 2014-16. Veeam Vanguard 2015-23. Nutanix NTC 2014-20. Several certifications including: VCDX-DCV, VCP-DCV/DT/Cloud, VCAP-DCA/DCD/CIA/CID/DTA/DTD, MCSA, MCSE, MCITP, CCA, NPP.
