Objective 1.2 – Install and Configure VMware ESXi
See also this similar post: Objective 1.2 – Install and Configure VMware ESXi and Objective 1.2 – Install and Configure VMware ESXi.
Perform an interactive installation of ESXi (similar as vSphere 4.x)
 Interactive installation is quite simple and similar to a generic ESXi 4.x.
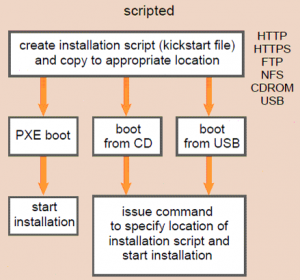
Seems strange but there is no mention on scripted installation (introduced first time, for ESXi, in version 4.1) in the blueprint, but IMHO you must know them, at least how you can boot from (you can PXE boot the ESXi installer or boot it from a CD/DVD or USB drive) and where you can put the kickstart file (the installation script can be stored in a location that the host can access by HTTP, HTTPS, FTP, NFS, CDROM, or USB). Also check the format of the kickstart file to know required and optional fields.
Of course the questions are not too deep on this aspects (there will be also a VCAP5-DCA exam…)
Deploy an ESXi host using Auto Deploy (new in vSphere 5.x)
See also: vSphere Installation and Setup Guide (page 57).
Auto Deploy is a new method for provisioning ESXi hosts in vSphere 5.0. At a high level the ESXi host boots over the network (using PXE/gPXE), contacts the Auto Deploy Server which loads the ESXi image into the hosts memory (the host become stateless). After loading the ESXi image the Auto Deploy Server coordinates with vCenter Server to configure the host, using Host Profiles (same as in vSphere 4.x) and Answer Files (answer files are new in 5.0). You can create image profiles with ESXi Image Builder CLI, and host profiles using the vSphere Client.
- vSphere 5 What’s New – Image Builder and Auto Deploy
- vSphere Auto Deploy Demo
- Configuring VMware vSphere Auto Deploy
- vSphere 5 – How to run ESXi stateless with vSphere Auto Deploy
Configure NTP on an ESXi Host (same as vSphere 4.x)
Is the same for ESX/ESXi from version 3.5 and can be configured from the vSphere Client. See also: How to configure NTP on VMware ESX.
Configure DNS and Routing on an ESXi Host (same as vSphere 4.x)
Is the same for ESX/ESXi from version 3.x and can be configured from the vSphere Client. See also: Use the VI Client to change DNS, gateway, and hostname.
Note that, compared to the old ESX host, in the ESXi there is only a single gateway (not one for Service Console and one, optional, for vmkernel interfaces).
Enable/Configure/Disable hyperthreading (same as vSphere 4.x)
See: vSphere Resource Management Guide (page 19).
To enable hyperthreading, you must first enable it in your system’s BIOS settings and then turn it on in the vSphere Client (in host Configuration tab / Processors / Properties). Hyperthreading is enabled by default.
Some Intel processors, for example Xeon 5500 processors or those based on the P4 microarchitecture, support hyperthreading. Consult your system documentation to determine whether your CPU supports hyperthreading.
Enable/Size/Disable memory compression cache (same as vSphere 4.1)
This new feature introduced in vSphere 4.1 is another memory management solution (faster that the last change: the VM swap). See official documentation for more info.
- To enable or disable this feature (enabled by default): change host Advanced Settings (Mem.MemZipEnable, 1 to enable or 0 to disable the memory compression cache).
- To change the size: still in host Advanced Settings (Mem.MemZipMaxPct, the value is a percentage of the size of the virtual machine and must be between 5 and 100 percent).
License an ESXi host (new in vSphere 5.x)
Host licensing in quite new in vSphere 5… But do not expect too much questions about it (is not a VSP5 exam).
The vCenter Server is still licensed on instance, but now each host is licensed not only per socket (one socket is a physical CPU package) but also per vRAM Entitlement and this value depends on the ESXi edition (note that the edition are the same as vSphere 4.x exept the Advanced that has been suppressed). For more info see: the vSphere 5 licensing model.


