


SwiftStack is a software solution to help people easily create large scale object storage infrastructure in their own data center. They can run their own globally-distributed storage cloud running behind the corporate firewall and keeping the data secure and locally.
The core engine IS OpenStack Swift. It’s not forked, fattened, or watered down. This means you get to utilize what drives some of the largest storage clouds, leverage the power of a vibrant community, and there is no vendor lock-in. To learn more on SwiftStack 4.0 just have a look at the product page.
To test the product, you can easy sign up, try it by yourself or a SwiftStack Expert will contact you to schedule a customized demo and demonstrate the different functions.
There is an easy and step-by-step quick start guide that can help you during the set-up, but you need to know at least how is the architecture of the solution:
And, if you plan to run on physical system, which are the hardware reference architectures.
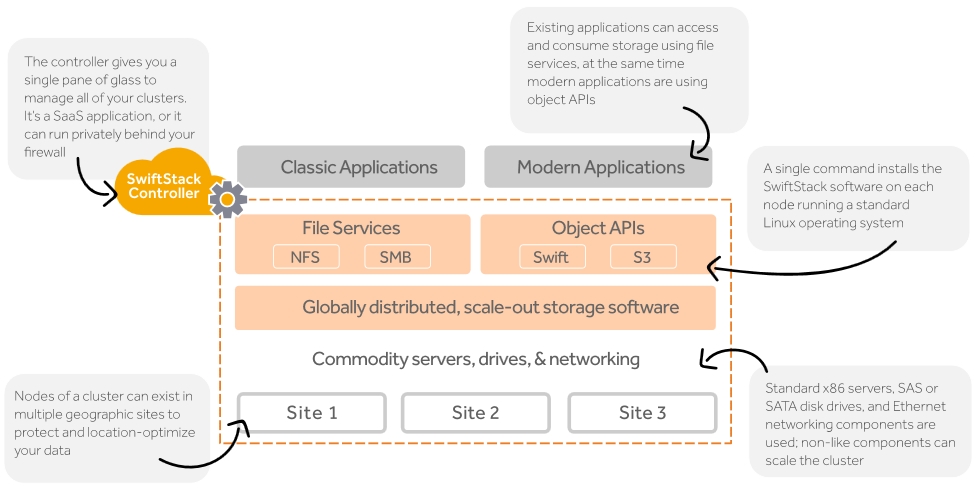
First you need a supported 64-bit OSes. SwiftStack supports the following Linux operating systems:
- Ubuntu 12.04 LTS or 14.04 LTS Server 64-bit
- Red Hat 6.4, 6.5, 6.6, 6.7, 6.8, 7.1, or 7.2 Server 64-bit
- CentOS 6.4, 6.5, 6.6, 6.7, 6.8, 7.1 or 7.2 Server 64-bit
- Oracle Linux 6.7, 7.2 Server 64-bit
Then you need a proper network configuration, that included static IPs, FQDN, firewall rules (both port 443/TCP and 1194/UDP will need to allow outgoing traffic on your firewall), but more important your SwiftStack nodes will need to reach the online SwiftStack Controller. Note that the connection can’t go through a HTTP proxy as the SwiftStack node requires a persistent connection with the SwiftStack Controller. This can limit the adoption in some companies, but there is also an option to have a local controller.
Anyway it can also run with NAT without big issues.
At this point you can create your first SwiftStack node. Just run (with root priviles) the following command:
curl https://platform.swiftstack.com/install
This will just output the command that you should run on your system to make some check (on the platform and the kernel version), add a new repository and install the node. Your can review those command on run manually or just run the command:
!! | bash
This command will simple run the last command (curl) and pass all the commands to bash (so it’s the same as run each line manually).
Several packages are added (as other OpenStack solution, you need a lot of python packages), but using apt or yum, so all dependency issues are managed automatically! Depending on your distribution and installation time, it can take some minutes. For a minimal installation of CentOS 6.x it take less than 5-10 minutes. Of course you can include the repository and all the required packages in the image of your nodes to speed up the deploy of multiple nodes.
As a last step of the installation, the new SwiftStack node contacts the SwiftStack Controller via https (port 443) to register itself. Upon successful registration a ‘claim’ URL is created. The claim URL will be displayed in the terminal as soon as the installation completes.
At this point you need to log into the SwiftStack Controller As-a-Service (that is on the public cloud, hosted at platform.swiftstack.com) and claim the node by copying the URL and pasting it into your browser. Note that you need first to create some admins for your organization, because the account created with the trial request, is not enabled to manage admins tasks. After the authentication, just verify the “What to do with this node:” dropdown field is set to Claim node as normal; it is not a replacement. Then choose “Claim node”. At this point the controller will Try to contact your node (this phase may take some minutes) and once the secure VPN (using OpenVPN) connection is established, the node will be available in the controller and then you can claim it.

You will have 1 unprovisioned node, until you will create a cluster in order to ingest it. You can provision more nodes or use the wizard on the public cloud to just create your cluster.
Just choose a name and the purpose of your cluster:

The network configuration part of the cluster is a little more complicated and the on-line help does not help too much (for example it tell that you can leave the Cluster API Hostname black, but it’s a required field!). You need a FQDN for your Cluster API and a load balancer, and optionally a SSL connection. Both the load balancer part and the SSL terminator can be provided by SwiftStack. It’s not clear if and how SwiftStack can provide also the DNS name for the Cluster API.
Now you can enable your SwiftStack node and there are different roles: the wizard has just two defined roles, Swift node (the default) or SwiftStack Gateway. During this step you can define also the region of each node (or you can change later in the Change Zone tab).
If you have multiple interfaces, you may specify how interfaces are used by Swift services using the Network tab. The same interface may be used for external and intra-cluster communications, but this can make much sense for a testing environment. For a real environment you may defined different networks at least for the replication traffic.
At this point the wizard will directed you to the Swift Drives tab where you can bulk formatting the node’s drives. Under the Unmanaged Drives section, locate the drives you wish to format. Often this will be the drives with the status of Available. To select all the drives at once, click the marked checkbox next to All Unmanaged Drives. Click the Format button to format the selected drives. You can add more drives to the node later, but note that the controller will take a few minutes to detect them. You don’t need to make partitions, using LVM or format the new drivers, all will be manage by the controller. Drivers will be mounted under /srv/node/d?, there ? is the number of the drive. The wizard can recognize properly HDD or SSD disks.
The wizard can also configuring and manage the Storage Policies. Right now there will be two policies you can select: Account & Container and Standard-Replica (the default option). Standard replicas has 3 copies, but you can choose from 2 to 6. Or you can use erasure coding instead of standard replicas.
Once the drives are configured, the last step in provisioning the node is to enable it. Click on the Enable tab and then click on the Enable button. Before deploy all the configuration of the cluster, you need to create a user for the data services.
When the cluster is deployed you can start using using RestAPI or application compliant with OpenStack Swift.
The entire process is quite easy, except some points where you need to plan carefully before (like the network configurations). But the controller as a service is really usefull can can hide most of the complexity of an object storage setup. Using a supported distribution the node physical deployment is really easy: you can choose your systems using commodity hardware (or also virtual machines) and provide the disks (you don’t really need a RAID controller, better is use HBA modes to managed each disk independently). Then you can manage everything from the on-line controller!
Disclaimer: I’ve take this free trial using the SwiftStack 2016 Blogger Program. Furthermore, between July 11 and August 11, the blogger who receives the most “engagement points” for their post from his or her audience will win an additional $1,000 for their charity. The runner up will earn a $250 donation.

