


During Windows installation you may notice the presence of a “Recovery Partition” in your system disks.
The purpose of a recovery partition is to allow you to restore your system to its factory settings or to a previous working state in case of a problem. A recovery partition can also include drivers, applications, and other files that are specific to your device.
The Windows Recovery Environment (WinRE) is a companion operating system installed alongside Windows 10, typically in a separate partition, that can help with troubleshooting, recovery, or booting from external media, such as a USB stick. WinRE is also used during the Windows update process to apply updates in specific paths or phases.
For more information see: Windows Recovery Environment explained
Delete the recovery partition
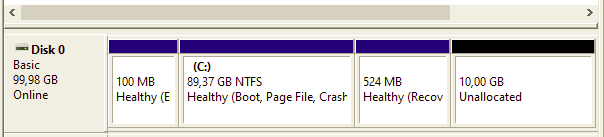
Usually the recovery partition is build AFTER the C: volume and this can be a problem if you plan to extend the C: volume!
Is it safe to delete Recovery partition in Windows? Yes. Removing a recovery partition will not affect the Windows operating system. How do I restore a deleted Windows recovery partition? To restore deleted recovery partitions, rebuild the Windows Boot Configuration Drive, use a third-party tool, or reinstall Windows.
But you cannot delete it from the GUI… You need to use the diskpart tool from the CLI:
DISKPART> select disk 0
Disk 0 is now the selected disk.
DISKPART> select partition 4
Partition 4 is now the selected partition.DISKPART> delete partition
Virtual Disk Service error:
The device is in use.The selected volume or partition is in use. To continue with the operation use the OVERRIDE parameter.
DISKPART> delete partition overrideCheck the recovery partition
You can verify the presence of the recovery partition with the disk management tools, but also from the CLI:
C:\Windows\system32>reagentc /info
Windows Recovery Environment (Windows RE) and system reset configuration
Information:
Windows RE status: Disabled
Windows RE location:
Boot Configuration Data (BCD) identifier: 165c49d6-c5dd-11ee-ad81-9e71eca1ae81
Recovery image location:
Recovery image index: 0
Custom image location:
Custom image index: 0REAGENTC.EXE: Operation Successful.If is enable
C:\Windows\System32>reagentc /disable
REAGENTC.EXE: Operation Successful.
Build a new recovery partition
In case you need the recovery partion again, there is a simple procedure to rebuild it:
1. Shrink Volume in Disk Management
- Press the Windows key and search for “Disk Management”.
- Right-click on C: (or the boot and primary partition).
- Select Shrink Volume…
- In “Enter the amount of space to shrink in MB”, input 1024.
- Click Shrink.
2. Create New Simple Volume
- Right-click on the new volume.
- Select New Simple Volume.
- Click Next.
- Click Next.
- Select Do not assign a drive letter or drive path.
- Click Next.
- Format this volume with the following settings:
- Volume label: System Reserved.
- Click Next.
- Click Finish.
3. Locate or Restore Winre.wim
- Open File Explorer and navigate to C:\Windows\System32\Recovery.
- If Winre.wim is not visible:
- Open Command Prompt in administrator mode.
- Run reagentc /info. If enabled, run reagentc /disable.
- If still not visible, go to the next step.
- In File Explorer, at the top, right-click on View, check Hidden items.
- Click on Options, then the View tab, and uncheck Hide protected operating system files (Recommended).
- If Winre.wim is still missing:
- Obtain a new copy of WinRE.wim.
- For a USB Windows image:
- Go to Sources and right-click on install.esd.
- Use 7-zip to Open Archive.
- Navigate to folder 1, then Windows\System32\Recovery.
- Copy the files to C:\Recovery\WindowsRE.
- For a Windows ISO:
- Extract the files and follow the same steps as for the USB.
4. Configure the New System Reserved Partition
- Determine the Partition Style:
- Go back to Disk Management.
- Right-click on disk 0 (or the disk with the OS).
- Select Properties, then Volumes.
- Note the Partition Style (GPT or MBR).
- Open Command Prompt in administrator mode and enter the following commands:
- diskpart
- list dis
- sel dis 0
- lis par
- sel par 3 (select the newly created partition)
- det par (verify the correct partition is selected)
- Set the Partition ID:
- If MBR: set id=27
- If GPT: set id=de94bba4-06d1-4d40-a16a-bfd50179d6ac
- Verify the Partition Type Change:
- det par
- exit
- Enable the Recovery Environment:
- reagentc /enable
- Verify with reagentc /info that the Windows RE location is on the correct partition.

