
The Dell Boot Optimized Storage Solution (BOSS) is a new option for the installation of the hypervisor part, in a virtualization enviroment, or more important in a hyper-converged infrastructure (HCI) host!
The dual SD option was already present in all PowerEdge, also in previous generations, and was a good choice to separate the hypervisor from the disks or simple use diskless based solutions. And was a good option for vSphere ESXi when servers were only used as a compute nodes.
But who is implementing HCI or also simple SDS solution, need to separate their OS drives from data drives and, of course, they require Hardware RAID Mirror (RAID1) for the operating system drives. The BOSS solution provides this separate HWRAID functionality for the OS drives while also freeing up additional drive slots to be used for ‘data set’ devices. It’s a PCI card with flash memory, so it’s fast enough and provides just a block level service like other disks.
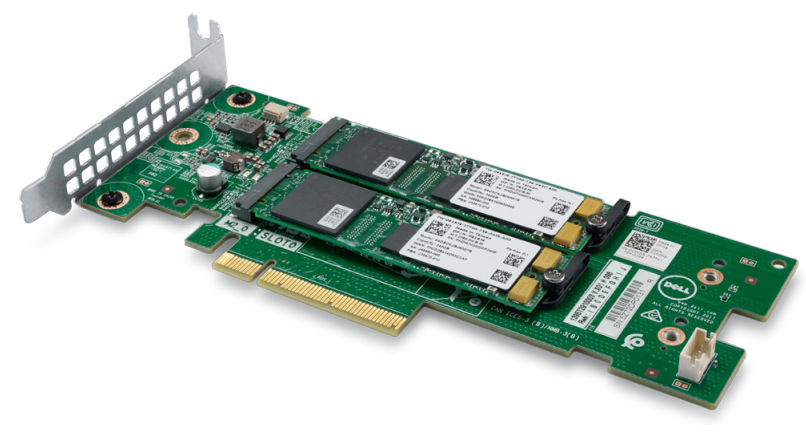 BOSS-S1 utilizes one or two read-intensive (Boot Class) 80mm M.2 SATA Solid State Devices (SSDs) which can be used in “pass-thru” or two devices in Hardware RAID 1 (mirroring). The M.2 devices are Read Intensive 120GB/240GB. The PCI card is a single x2 PCIe Gen 2 host interface (x8 connector).
Configuring the boot device
The first step is creating a virtual disk with the BOSS-S1 device, and you need to use the BIOS setting to perform this task:
- Turn on the system.
- Press F2 to enter System Setup, and then .
- Select the Create RAID configuration option.
- Select the two M.2 SATA physical disks displayed, and then click Next to proceed to next page.
- Choose the appropriate options as required, and type the name for the virtual disk.
- Select Yes for Would you like to create virtual disk option? and then click Next to proceed to next page.
Virtual disk is created successfully and you can verify the virtual disk information at the . The created virtual disk is displayed in the Virtual Disk Info.
Note that, like the dual redundant SD card, the BOSS card does need that you power-off the host in order to replace a device. Not as beauty like a dual hot-swap hard disks solution, but reasonable for the use cases (build HCI clusters).
Installing ESXi on BOSS-S1 card
The next step is installing the ESXi using the previosly created device.
To install ESXi on the BOSS-S1 device, complete the following procedure:
- Turn on the system.
- Insert the ESXi installer media that you created earlier into the optical drive. For more information, see the Download the Dell EMC customized ESXi image section.
- Then the Dell EMC logo is displayed, press F11 immediately.
- At the Boot Menu, use the up- and down-arrow keys to select the optical drive and press Enter. When the installer image loads, the system is ready to begin the installation process.
CAUTION: Step 5 deletes all data on the selected BOSS-S1 device. - On the Select a Disk page, select the BOSS-S1 device on which you want to install ESXi and press Enter.
- Enter the root password and press Enter to reboot the system.
- When the installation process is complete, press Enter to reboot the system. The system restarts and starts ESXi.
See also
- Dell Boot Optimized Storage Solution (BOSS) card
- VMware vSphere ESXi 6.7.x on Dell EMC PowerEdge Servers Installation Instructions and Important Information Guide
- VMware vSphere ESXi 6.7.x on Dell EMC PowerEdge Servers Installation Instructions and Important Information Guide

Related Posts
Andrea Mauro
Virtualization, Cloud and Storage Architect. Tech Field delegate. VMUG IT Co-Founder and board member. VMware VMTN Moderator and vExpert 2010-24. Dell TechCenter Rockstar 2014-15. Microsoft MVP 2014-16. Veeam Vanguard 2015-23. Nutanix NTC 2014-20. Several certifications including: VCDX-DCV, VCP-DCV/DT/Cloud, VCAP-DCA/DCD/CIA/CID/DTA/DTD, MCSA, MCSE, MCITP, CCA, NPP.
