Reading Time: 3 minutes

One of the interesting feature of VMware SRM 5.0.x is the vSphere Replication (VR) technology that is a VM a replication engine (part of SRM 5.0 and that also requires ESXi 5.0 and later) to implement protecting and replicating virtual machines between sites without the need of storage array–based replication (that usually it’s costly and too much vendor dependent).

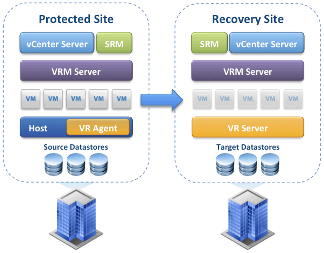
It use different elements:

  • VRA (vSphere Replication agent): included in ESXi starting from v5.0
  • VRMS (vSphere Replication Management Server): one virtual appliance (VA) for each site to handle the communication
  • VRS (vSphere Replication Server): one virtual appliance (VA) on the DR side that is just the “target” of the VR agent

The deployment of all those VA could be simple handled from the SRM plugin.

How VR determines what is different and what needs to be replicated

There are two forms of synchronization that VR will use to keep systems synchronized:

  • “Full synch”: that happens usually just on the first pass when the VM is configured for VR, but can also happen occasionally during other situations such as when recovering from a crash.
    When VR is first configured for a virtual machine you can choose a primary disk file or set of disk files and a remote target location to hold the replica. This can be an empty folder, or it can be a copy of the VMDK that has the same UUID as the primary protected system.The first thing VR will do when synchronizing is read the entire disk of both the protected and recovery site and generate a checksum for each block.
    Then it compares the checksum mapping between the two disk files and thereby creates an initial block bundle that needs to be replicated on the first pass to bring the block checksums into alignment. This happens on port 31031.
  • “Lightweight delta”: the ongoing replication is by use of an agent and vSCSI filter that reside within the kernel of an ESXi 5.0 host that tracks the I/O and keeps a bitmap in memory of changed blocks and backs this with a “persistent state file” (.psf) in the home directory of the VM. The psf file contains only pointers to the changed blocks. When it is time to replicate the changes to the remote site, as dictated by the RPO set for the vmdk, a bundle is created with the blocks that are changed and this is sent to the remote site for committing to disk. This replication happens on port 44046.

For more information see also:

Reading Time: 2 minutes

Recently I got a strange issue using a cold storage migration usign the Migrate function of vCenter Server.

This was the scenario: a Free Hypervisor with some VMs where a full license (Essential Plus) was added and the host was also added to a vCenter Server. For compatibility matrix reason the version 4.1 was used (although the storage can work with vSphere 5.0 but officially was not supported). Also the Free Hypervisor was build with the 4.0 version and upgraded (one year ago) to the 4.1 version.

This was the issue: after a cold storage migration all the VM build when the ESXi was on version 4.0 have changed their MAC address. No issue on the VM build when ESXi was upgraded to the 4.1 (but still in free mode).

continue reading…

Reading Time: 2 minutes

Around a month ago I’ve got an issue with VMware SRM 5.0.1 during a test of the Recovery Plan.

In my case the storage was well configured for the replication, but not to permit the reverse reverse replication. So the reprotect task was locked and there was no way to remove this state because also the Delete Protection group was greyed out. If you fix the storage part usually the issue could be fixed in a clean way, but in my case the original LUN was removed and was not possible resume or fix the operation (also if you build a new LUN the ID could not be same). Also a SRM reboot was unsuccessful because the state was in the database.

I’ve looked around but I’ve not found a clean solution, so I’ve simple build a new Protection Group to look in the SRM DB and compare the wrong state with the clean one. With a little of patiance you can find the tables (note that are more than one and both on the production and the disaster recovery site) and fix the values. After that you can finally delete the Protection Group to really clean the database.

Now I’ve notice that there is a recent KB 2032621 (Protection group in vCenter Site Recovery Manager 5.x hangs in reprotecting state during the reprotect task), available from Aug 9 2012, that describe exactly this situation and the same solution.

Reading Time: < 1 minute

If Veeam Backup Enterprise Manager is installed on the same server as Veeam Backup and Replication, and Veeam Backup and Replication is upgraded to version 6.1 without upgrading Veeam Backup Enterprise Manager, you will get an error about the Veeam Backup Catalog Data service. Upon rebooting, the server will go into an infinite reboot loop.

The solution is well described in the KB 1645:

  1. Uninstall Veeam Backup Enterprise Manager and Veeam Backup Catalog service.
  2. Run Veeam_B&R_Setup_x64 to upgrade Veeam Backup and Replication to version 6.1.
  3. Allow machine to restart.
  4. Run Veeam_B&R_EnterpriseManager_Setup_x64 to upgrade Veeam Backup Enterprise Manager to version 6.1.

If you are experiencing reboots:

  1. During the boot process, click F8 and boot from “Last Known Good Configuration”.
  2. Uninstall both Backup and Replication and Enterprise manager and proceed to install 6.1 components instead.
Reading Time: < 1 minute

Some months ago I’ve realize a course for the Backup Academy titled: Basic principles of backup policies. Now it’s available also a whitepaper title “Backup policies defined for VMware VMs” (but it’s enough general to be applied for generic policies, both for physical and virtual environment).

This is the list of all the media type available on my course:

Reading Time: 5 minutes

In the previous posts we have discuss about the architecture and the deployment of NexentaVSA for View. Has you have probably notice the configuration of NexentaStor VSA is really simple: just an OVF deploy, a test to verify that all is fine and a convert to template to be used during virtual desktop pool deployment. Now let’s talk about how use this product, that it’s well described in the User Guide and also in this video.

As written in the previous post, the management appliance could be controller with a simple browser (Mozilla Firefox v9 or later or Google Chrome v12x or later, but seems to work also on Microsoft Internet Explorer 9) using the URL http://ManagementVM:3000.

The GUI elements are:

  • NexentaVSA for View bar: the NexentaVSA for View wizards starts when you press these icons.
  • Objects List: this area lists all the objects that are associates with NexentaVSA for View. You can select objects from this list to view or perform actions.
  • Recent Activity panel: displays current and recent activity status. When a wizard processes an action, the transition status messages are displayed in this area. Click Show all to view the Activity report.
  • Working area: displays status, reference, selected actions links for the object selected in the related objects list.

The deploy of a new virtual desktop pool could start from the “Deploy VDI” button (remember that your VMware cluster must not contain any desktop pools, execpt the master golden image, prepared with the guest OS, VMware Tools, View Agent and the Client Agent). Note that you do not need to use anymore the View Manager interface, because the NV4V wizard will orchestrate the entire process.

Pools could be provisioned as Full Cloned or Linked-Clones (using VMware Composer). Also pools could be:

  • Stateless virtual desktops (in View Manager are the Automated Floating desktops): do not include any personal settings or data. When users log in, they are assigned a desktop randomly. User can create and stores data on a network file share or on a VMware View desktop persistent disk. When you select the stateless desktop pool type, NexentaVSA for View automatically assigns the Linked-Clones provisioning type.
  • Persistent virtual desktops (in View Manager are the Persistent and Assigned desktops): preserve user settings, customization, and data. When users log in, they retrieve their designated desktops. When you select the persistent desktop pool type, NexentaVSA for View automatically assigns the Full Clones provisioning type.

Then the wizard is quite similar to the one in View Manager (maybe a little simple, with less tab to explore), but with a big difference: the Configure Storage tab!

In this step you can choose to Create a new NexentaStor VSA(s) or using an existing external NFS storage (that could be an existing NexentaStor VSA or Hardware Appliance, or an existing NFS share address). The deployment of a new NexentaStor VSA could be completely automatic (if you have prepared the template for it).

The choice to use NFS, instead of iSCSI, is for a scalability reason and to use ZFS locking features, instead of VMFS. I suppose that probably there is also a reason related to the efficiently of the VSA.

Except the storage part the pool provisioning is quite similar to the one in View Manager. But is not similar how you can see and monitor the used resources: the NexentaVSA for View Management interface can summarize if few pages a lot of useful information about your virtual desktop pools.

And is unique the Benchmark part, where you can test and measure several parameters (included IOPS with different tools) and also you can simulate and test a boot storm! The benchmark aspects are completely uncovered by View Manager, and are not so easy to obtain (or analyze) from the vCenter Server.

Also the Calibration is another unique function of this product: using the incremental benchmarks, the Calibration wizard helps you to determine the maximum number of desktops, memory, CPU cores, or cache size that are supported with a selected I/O performance.

Of course NexentaVSA for View does not replace the View Manager and VMware licenses. And does not completely eliminate the need of some kind of shared storage (for the management cluster, if you want/need high availability, but also the user states, if you need them). But could add some really interesting features and also use you host local storage efficiently.

About the cost, it is licenced per virtual desktop and the official price is around 35$ per VM (with gold level support) with a minimum kit of 100 VM (that include also the license for NexentaStor VSA).

Previous posts:

Reading Time: 4 minutes

In the previous post I’ve described the NexentaVSA for View architecture and the files included in the download packages. The deployment, installation and configuration is not a simple and immediate step, but is well described in the Installation Guide and also on this video.

There are several requirements for the vSphere datacenter (the NexentaVSA for View environment requires a separate datacenter for each ESXi cluster), the VMware cluster (the NexentaVSA for View environment requires at least one ESXi cluster that contains one or more ESXi hosts, but must also be an empty cluster or are least without any virtual desktop already deployed), virtual networking (basically you need a NFS network, better if dedicated), for the NexentaStor VSA and virtual desktop templates (for virtual desktop remember to install VMware Tools, View Agent and NexentaVSA for View Agent), and so on. All requirements are well described in the Installation Guide (that include also a pre-installation checklist) but some part are betted described in the video. What is really important is that you build a dedicated VMware cluster for virtual desktop hosts (cluster configuration is adjusted automatically by the management part). Also virtual networking configuration is mandatory (unless you have only a single ESXi host).

The installation of the NexentaVSA for View Management Appliance (based on an Linux Ubuntu distribution with credential root/nexenta) is quite simple (just an OVF deployment), but again there are several requirements.

The NexentaVSA for View Management Appliance should be located on the management ESXi host (or a management cluster). NexentaVSA for View Management Appliance requires full network access to all components and must have administrative privileges to vCenter and View Connection Server.

When the VM has been deployed (it will use 1 vCPU, 2 GB of vRAM and 20GB of storage) you can enter in the console to fix networking (by default is in DHCP) and timezone (if needed) and then run the Configuration Wizard.

To enter the Configuration Wizard you simple need a browser (also Chrome 12 and later is supported) to connect to the http://IP:3000 URL (as also prometed on the console).

The main tasks are the product registration, the configuration of the connection to View Connection Server and the configuration to vCenter Server.

Note that on the View Connection Server you must:

  • Activate the View Power CLI (by open the View Power CLI as Administrator and type the command “Set-ExecutionPolicy RemoteSigned”).
  • Install the NexentaVSA for View Server Agent.

Only in this way you will able to connect your View Connection Server (otherwise you will get a generic connection refused error).

In order to register the product you need a valid Product key, also for the trial version.

To receive the product key you must use the “Virtual Appliance Signature” (prompted in the registration page of the VA) to fill the “Machine Signature” field in the online registration.

The registration procedure maybe could be improved in future version to become more simplest, as also the overhall setup of the infrastructure. But again, the Installation Guide is quite detailed and well done and could really help in a good and successful deployment.

© 2025-2011 vInfrastructure Blog | Disclaimer & Copyright